 .AI
.AICliniko
Connect your Cliniko account to APIANT.AI with a Cliniko API key, then describe the automation you want in plain English.
APIANT.AI connects Cliniko to the other software your practice uses, such as email marketing, CRMs, accounting, forms and spreadsheets. You connect Cliniko once, describe what should happen in plain English, and APIANT.AI builds the automation, tests it and runs it.
Connecting takes about five minutes. You need a Cliniko user account that is allowed to create API keys.
Step 1. Create your APIANT.AI account
- Go to app.apiant.ai and sign up. You can continue with Google, continue with GitHub, or use an email address and password.
- Confirm your email if asked.
The free plan is enough to connect Cliniko and build your first automation. No credit card is needed.
Step 2. Create an API key in Cliniko
- Sign in to Cliniko.
- Open My info (your name, bottom left of the navigation).
- Under API keys, select Manage API keys.
- If you don't see it, check that Allow yourself to create and use API keys is set to Yes on the same page. If you can't change that setting, ask your Cliniko account owner to turn it on for you.
- Select Add an API key.
- Give it a name you will recognise later, for example APIANT.ai, and select Create API key.
- Copy the key. You will paste it into APIANT.AI in the next step. Cliniko advises giving the key straight to the application, with no need to keep a copy of your own.
An API key has the same access to your Cliniko data that you do, so treat it like a password. Use a separate key for APIANT.AI rather than one shared with another app.
Step 3. Connect Cliniko in APIANT.AI
- In APIANT.AI, open Connections in the top bar and select Connect App.
- Search for Cliniko and select it.
- Fill in the fields:
| Field | What to enter |
|---|---|
| Account name | Optional. Keep the default, or give the connection a name of your own, for example your clinic's name. Useful if you connect more than one Cliniko account. |
| API Key | The key you copied from Cliniko. |
| Shard | The letters and number at the very end of your key, after the last dash. For example, a key ending in -au1 has the shard au1. Other examples are au2, uk1, us1 and ca1. |
| User-Agent | Your practice name and a contact email, for example Sunrise Physio (admin@sunrisephysio.com). Cliniko asks every connected app to identify itself this way. |
- Select Connect. APIANT.AI checks the key with Cliniko straight away. If it is accepted, Cliniko appears on your Connections page.
Step 4. Describe what you want
Open Assistant in the top bar and say what should start the automation and what should happen next, in one plain sentence. For example:
"When a patient who has agreed to marketing emails books an appointment in Cliniko, tag them in AWeber with the treatment they booked."
"When a new patient is added in Cliniko, add them to our email newsletter list."
"When an invoice is created in Cliniko, add a row to our Google Sheet."
If the other app isn't connected yet, the assistant asks you to connect it, the same way you connected Cliniko.
The assistant builds the automation, tests it with a real record from your account, and tells you what it did. Every automation is shown as a step-by-step picture, and every run is recorded with each step marked as a success or a failure.
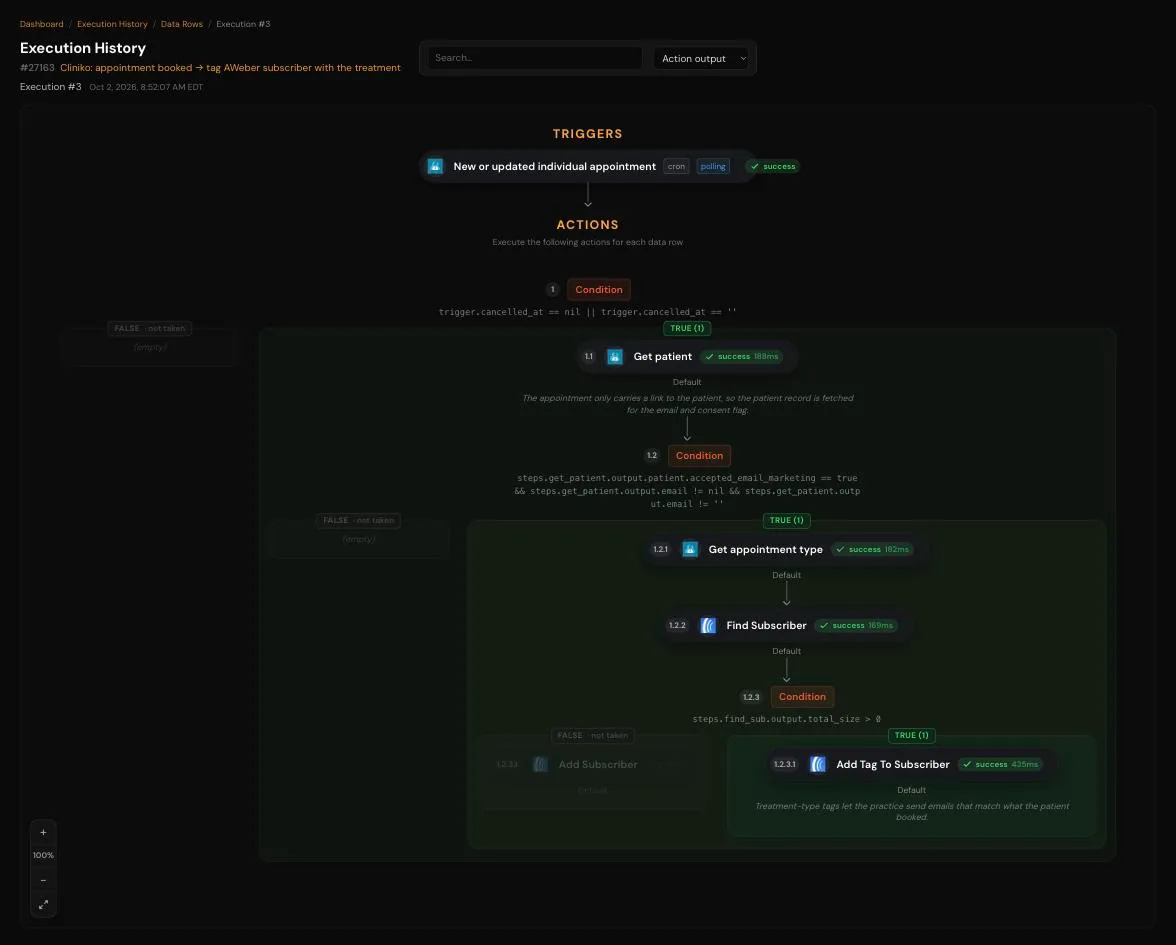
When you're happy with the test, switch the automation on from your dashboard. For more on the assistant, see The APIANT assistant.
What APIANT.AI can do with Cliniko
- Start an automation when a patient is added or updated, an appointment (individual or group) is booked, changed or cancelled, an attendee is added, an invoice is created or updated, or a contact, practitioner, patient case, treatment note or communication is added.
- Create and update patients and contacts in Cliniko from your other apps.
- Keep records in step between Cliniko and another app with two-way sync for patients and contacts.
APIANT.AI only reads or writes the Cliniko records an automation is set up to use.
Disconnecting
- In APIANT.AI: on the Connections page, open the menu next to your Cliniko account and select Disconnect. Automations that use it are switched off.
- In Cliniko: go to My info > Manage API keys and select Archive next to the APIANT.ai key. APIANT.AI can no longer use it.
Troubleshooting
"The API key you entered was not accepted." Check that the key was copied in full and that the Shard matches the end of the key exactly (for example au1, not AU1 or -au1). If the key was archived in Cliniko, create a new one.
I can't find Manage API keys. Your Cliniko user may not be allowed to create API keys. Ask your Cliniko account owner to set Allow yourself to create and use API keys to Yes for your user.
An automation stopped working after a staff change. The key belongs to the Cliniko user who created it. If that user is removed or their key is archived, create a new key under an active user and reconnect Cliniko in APIANT.AI.
Support
Email support@apiant.com. If a run failed, include the link to that run so we can see the exact step.